XTS Update Process – From Version 10.00.14 or 10.01.06
(PLEASE NOTE: This is the process for the XTS, not the XTSPlus. For more information on how to update the XTSPlus and tell the difference between the two please click HERE)
All of the steps listed below are performed on the XTS touchscreen itself. You don’t need to use a phone/tablet/computer and you do NOT need to remove the XTS from the wall. The steps are all performed on an installed and running XTS touchscreen.
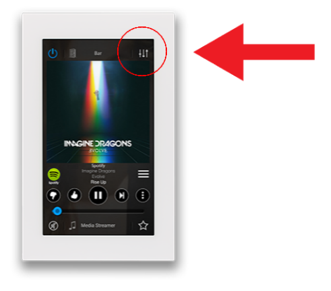
- From the Now Playing Screen, tap the Settings icon in the top right
- From the Settings Menu, scroll down and tap the “About Russound XTS” option
- Confirm the Version Number
- 10.00.14
- 10.01.06
- Press and Hold the Settings icon in the top right until “Admin Settings” appears (this will go through two screens; settings then admin settings, and take about 4 seconds)
- Tap on the IP address in Blue
An IP Address change screen will appear - Tap on “Enter Preview Mode” at the bottom of the screen
- From the Preview Mode Now Playing Screen, tap on the Russound Launcher icon
- From the Add Launcher Menu, tap on “Application”
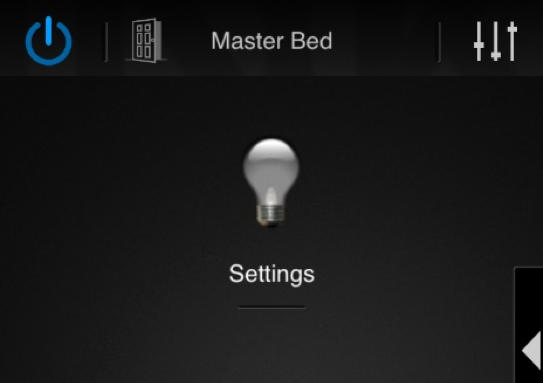
- Select any icon (you are going to create a temporary launcher so the icon you choose doesn’t matter. In our example, we’re choosing the light bulb)
- From the Add Launcher screen, enter the name “Settings” in the Launcher Name Field
Any name will work, but naming this launcher as “Settings” makes it very easy to identify this launcher later. - From the Add Launcher screen, enter the following text in the URL field exactly as shown:
com.android.settings - Tap on “Save” to save the new Settings Launcher that you just created.
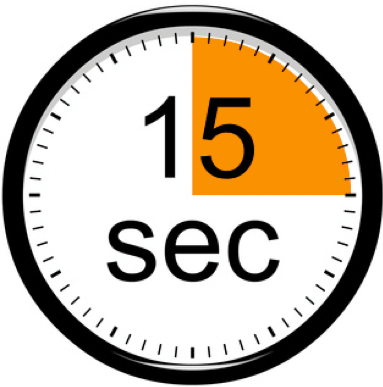
NOTE: Before proceeding, read all of Step 4. The XTS will reboot 15 seconds after you activate the Settings Launcher. Don’t worry if the device reboots before you finish Step 4. If that happens, you will just need to go back to Preview Mode following the steps above and re-activate the Settings Launcher.
- Tap on the Settings Launcher that you just created in Step 3 to activate it.
(It will have the icon you just selected and be called “Settings”. In our example, it’s the light bulb icon and the word “Settings” for a name as shown here.)
- From the XTS Android Settings Screen:
Scroll down to the “Security” section and tap it to select it (It is the second option under “Personal”) - From the Security Sub-Menu,
Tap “Unknown Sources” to enable it (a checkmark will appear in the box when enabled) - A pop-up caution message will appear asking you to confirm the change.
Tap on OK in the popup window. - Wait for the XTS to reboot (it will reboot automatically when the 15 second timer expires. The XTS takes less than a minute to reboot).
- Enter the MyRussound App’s Preview Mode by repeating Step 2 above
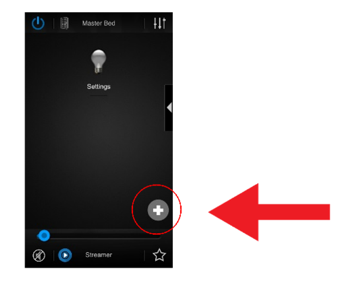
- From the Preview Mode Now Playing Screen, tap on the Russound Launcher icon
- From the Launcher Menu, tap on the “+” icon (once you’ve created your first launcher above, to add a new launcher, you must tap on the “+” icon to add a new launcher)
- Select “Web Page” as the type of launcher you want to create
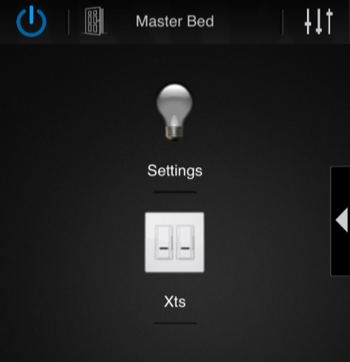
- Select any icon (you are going to create a temporary launcher so the icon you choose doesn’t matter. In our example, we’re choosing the light switch)
- From the Add Launcher screen, enter the name “Xts” in the Launcher Name Field
Naming this launcher as “Xts” makes it very easy to identify this launcher later. - From the Add Launcher screen, enter the following text in the URL field exactly as shown:
updates.russound.com/xts/xts.apk - Tap on “Save”
NOTE: Before proceeding, read Step 6 a-f. The XTS will reboot 15 seconds after you activate the Web Page Launcher named “Xts” that you just created. Don’t worry if the device reboots before you finish these steps. If that happens, you will just need to go back to Preview Mode following Step 2 and re-activate the Xts Launcher.
- Tap on the Launcher that you just created at the end of Step 5 to activate it. (It will have the icon you just selected and the name you just entered. In our example, it’s the light switch icon and the word “Xts” for a name.)
- A window will show up with two options. Tap the ES Downloader and tap “Just Once”
- A pop up will appear, tap “Open File”
- Another pop up will appear, tap “Install”
- Quickly scroll down to the bottom of the screen where it says “Install” and tap that
- A screen will come up that says “installing…” and then “App installed”. Tap where it says “Open” at the bottom of the screen
- A pop up screen will appear asking you to confirm you want to install the latest OS image for this device. Tap “yes”
- Wait for the update file to download (depends on internet connection speed but should be about 1-2 minutes). The XTS will reboot automatically
- Wait for the Installation process to complete (should take 1-2 minutes)
- The XTS will reboot and show the Russound cube icon and go through initialization after the install (could take up to 5 minutes)
- From the Now Playing Screen, Press and Hold the Settings icon in the top right until “Admin Settings” appears
- Tap “Clear Cache and Data”
- The XTS will return to the searching for devices screen
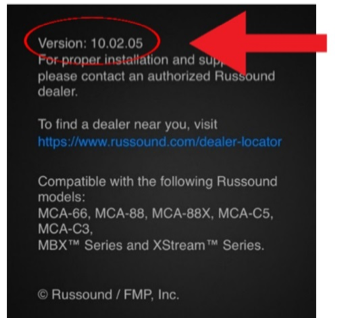
- From the Settings Menu, scroll down and select the “About Russound XTS” option
- Confirm that the version is now showing 10.02.05 or higher
Congratulations! You’re done.
All future updates on the XTS will now be made by choosing “Check for Updates” on the MyRussound Settings screen.